- All
- Product Name
- Product Keyword
- Product Model
- Product Summary
- Product Description
- Multi Field Search
Views: 0 Author: Site Editor Publish Time: 2025-07-14 Origin: Site


Imagine you plan a quick home repair or a small construction project, like setting fence posts or patching a garden path. You reach for a 25kg cement bag because it suits concrete, mortar, and render jobs without overwhelming you with bulk. Many residential builders and DIY users choose this size for its easy handling and precise control over cement use. Check out the widespread use and versatility of 25kg bags in the table below:
| Metric/Category | Data/Description |
|---|---|
| Packaging Types | 25 kg bags, 50 kg bags, bulk, mini bags |
| Application Areas | Residential, Infrastructure Repair, DIY |
| End-user Types | DIY Users, Contractors, Construction Companies |
Knowing how much a 25kg cement bag covers helps you avoid waste and finish your construction project efficiently. You get reliable results for every cement task at home.
A 25kg cement bag is ideal for small home projects like slabs, fence posts, and repairs because it is easy to carry and reduces waste.
You can mix cement for concrete, mortar, and render using a 25kg bag, giving you control over the strength and quality of your work.
Using the right mix ratios and following project tips helps you create strong, durable concrete and mortar for lasting results.
Planning the amount of cement you need with calculators saves money and prevents leftover waste.
Store cement bags in a dry, raised place away from moisture to keep the cement fresh and easy to use.
Lift and carry 25kg bags safely by bending your knees, keeping the bag close, and avoiding twisting to prevent injury.
The 25kg bag size offers the best balance of convenience, cost-effectiveness, and low waste for most home construction tasks.
Leftover cement can be reused for small repairs or creative projects, helping you save money and protect the environment.
You often need a strong base for patios, sheds, or small walkways. A 25kg cement bag gives you the right amount of concrete to pour a small slab without heavy lifting. You can mix the cement with sand and gravel to create a durable slab that supports weight and resists cracking. When you pour the concrete, you control the mix and thickness, which helps you get the job done right. For a garden retaining wall or a small outdoor platform, you can use one or two bags to pour a slab that measures about 0.0625 cubic meters per bag. This size fits most home projects and keeps waste low.
Setting fence posts requires a stable footing. You can use a 25kg cement bag to pour concrete directly into the hole around each post. This method locks the post in place and prevents shifting over time. For most standard posts, one bag per hole is enough. If you plan on adding concrete footings for a garden retaining wall or a mailbox, you can rely on the same approach. The manageable size of the bag makes it easy to carry and pour, even if you work alone. Here are some project pro tips: always tamp the soil before pouring, and add water slowly to avoid a runny mix.
Tip: For best results, pour the concrete in layers and use a stick to remove air pockets. This step increases the strength of your slab or footing.
You can use a 25kg cement bag to mix mortar for brickwork. Mortar holds bricks together and fills gaps, creating a solid wall or structure. When you mix cement with sand and water, you get a smooth, workable mortar that spreads easily. For small repairs or building a short wall, one bag covers several rows of bricks. You can adjust the mix to match the job, making it easy to get the job done right every time.
Blockwork needs a thicker mortar mix. You can use the same 25kg cement bag to prepare mortar for concrete blocks. This method works well for garden retaining walls, raised beds, or even a small shed base. The bag size lets you mix just enough mortar for each stage, so you avoid waste and keep your project on track. Here are some project pro tips: mix in small batches and use a clean bucket to measure water for consistent results.
Rendering protects and smooths exterior and interior walls. You can use a 25kg cement bag to mix render for up to 2 square meters of wall area. This coverage makes it ideal for patching or finishing small sections. The cement in the render creates a hard, weather-resistant surface that lasts for years. You can apply the mix with a trowel and finish it with a float for a smooth look.
When you render or plaster, always mix the cement thoroughly with sand and water. Apply the render in thin layers and let each layer set before adding the next. This method prevents cracks and gives you a strong, even finish. Store your 25kg cement bag in a dry place to keep it fresh and easy to use. Here are some tips: use gloves to protect your hands, and clean your tools right after use.
Performance Table:
The table below shows the strength and durability you can expect from a 25kg cement bag mix. These values prove that your concrete and mortar will stand up to daily use.
| Property | Mean Value | Unit | Specimen Dimensions (mm) | Specimen Count |
|---|---|---|---|---|
| Cube compressive strength | 87.6 | MPa | 150 × 150 × 150 | 4 |
| Cylinder compressive strength | 80.7 | MPa | 150 × 300 | 4 |
| Prism compressive strength | 87.3 | MPa | 40 × 40 × 40 | 18 |
| Flexural tensile strength | 8.8 | MPa | 160 × 40 × 40 | 9 |
| Splitting tensile strength | 3.7 | MPa | 100 × 200 | 4 |
| Young's modulus | 32,640 | MPa | 160 × 40 × 40 | 9 |
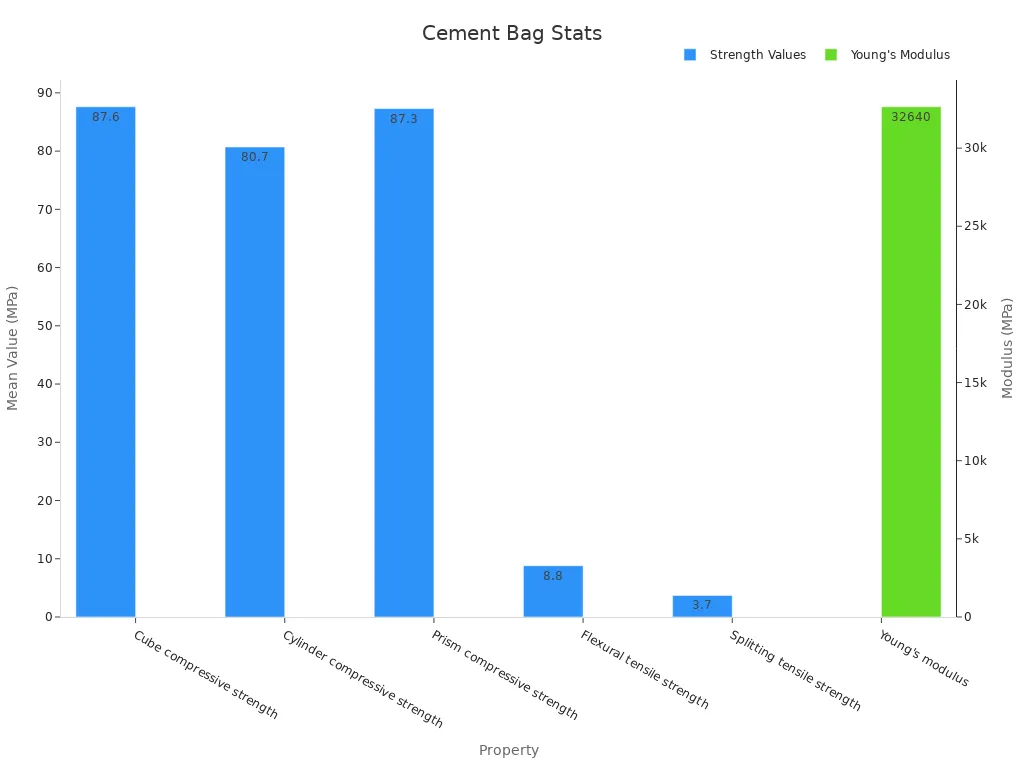
You can see from the table and chart that a 25kg cement bag delivers high compressive and tensile strength. This performance means your concrete slab, mortar joints, and render will last and resist damage.
When you tackle repairs and patching around your home, a 25kg cement bag gives you the right amount of material for small jobs. You can fix cracks, fill gaps, and restore surfaces without needing a large supply. You get control over the mix and can work at your own pace. This section covers two common repair projects: pathways and garden steps.
Cracked or uneven pathways can cause trips and look unsightly. You can use cement to repair these areas and create a smooth, safe surface. Start by cleaning the damaged section. Remove loose pieces and sweep away dirt. Mix your cement with sand and water to make a strong patching compound. You want a thick, workable mix that holds its shape.
You can pour the cement mix into the crack or hole. Use a trowel to press it down and level it with the rest of the pathway. For larger repairs, you may need to create a small slab to fill the space. Shape the slab to fit the gap, then pour the concrete mix and smooth it out. Let the patch set before you walk on it.
️ Tip: Always dampen the area before you pour the cement. This step helps the new concrete bond with the old surface.
If you need to replace a whole section, break out the damaged part and prepare the base. Pour a fresh slab using your cement mix. Level the surface and finish with a broom for texture. You can complete most pathway repairs with one or two 25kg bags.
Garden steps take a lot of wear from foot traffic and weather. Over time, cracks and chips can appear. You can use cement to patch these spots and keep your steps safe. Clean the damaged area and remove any loose material. Mix your cement until it reaches a thick, paste-like texture.
Pour the cement into the crack or chip. Use a trowel to press it in and shape the edge. For bigger repairs, you may need to pour a new step slab. Build a simple form with wood to hold the concrete in place. Mix your cement, then pour it into the form. Tap the sides to remove air bubbles and level the top.
You can also use cement to resurface worn steps. Spread a thin layer of the mix over the step and smooth it with a float. This method gives your steps a fresh look and adds grip. Let the slab cure before using the steps.
Here is a quick checklist for garden step repairs:
Clean and prep the area.
Mix cement to the right consistency.
Pour and shape the patch or slab.
Let the concrete cure fully before use.
| Repair Task | Cement Needed | Slab Size (approx.) | Pour Steps |
|---|---|---|---|
| Pathway Crack | 1/4 bag | Small patch | Pour, level, cure |
| Pathway Section | 1 bag | 0.0625 m³ slab | Pour, finish, cure |
| Garden Step Chip | 1/4 bag | Small patch | Pour, shape, cure |
| New Step | 1 bag | 0.0625 m³ slab | Pour, form, cure |
Note: Always store your cement in a dry place. Moisture can ruin the mix and weaken your concrete slab.
You can see that a 25kg cement bag covers most repair and patching needs for pathways and garden steps. You get enough material to pour a new slab or fix cracks without waste. You also avoid the hassle of moving heavy bags. With careful mixing and pouring, your repairs will last and look professional.
When you plan a project, you need to know how much concrete you can make from a 25kg cement bag. The volume of one bag of cement depends on the mix and the job. Most concrete calculators show that a 25kg cement bag yields about 0.01 cubic meters of concrete. This means you can fill a small slab or footing with one bag. If you want to estimate the total volume of cement required for a larger project, you can use a simple calculator.
Here is a step-by-step method to estimate the amount of cement and the volume of concrete you will get:
Calculate the wet volume you need (for example, 1 cubic meter).
Multiply by 1.54 to get the dry volume (to account for air gaps).
Use the mix ratio (like 1:1.5:3) to find the amount of cement needed.
Convert the cement part to weight using the density (1440 kg/m³).
Divide the total weight by the bag size to get the number of bags.
You can use online concrete calculators to check your math. These tools help you avoid running out of material or buying too much. If you want to pour a cubic yard of concrete, you will need about 76 bags of 25kg cement. Always round up to make sure you have enough.
Tip: Use a calculator before you start mixing. This step saves time and money.
If you plan to render a wall, the volume of one bag of cement covers about 2 square meters at standard thickness. You can use a calculator to estimate the total volume of cement required for your wall. For example, if your wall is 8 square meters, you will need four bags. Always check the thickness and adjust the amount of cement as needed. Concrete calculators can help you plan for both small and large jobs.
The right mix ratio gives you strong, durable concrete. For a 25kg cement bag, you usually add 5 to 7 liters of water. The volume of one bag of cement, when mixed, creates enough concrete for small slabs or posts. The table below shows common mixing ratios and other useful details:
| Parameter | Value |
|---|---|
| Mixing Ratio 1 | 25kg cement : 5L water |
| Mixing Ratio 2 | 25kg cement : 6.3L to 7L water |
| Dry Powder Density | Approx. 1.3 kg/L |
| Working Time | About 30 minutes at 20°C |
| Consumption | 21.7 kg/m² per mm thickness |
| Compressive Strength | ~6 MPa after 1 day; 18-20 MPa after 28 days |
| Flexural Strength | >2 MPa after 1 day; >5 MPa after 28 days |
| Fire Resistance | Rating A1 |
You can use a calculator to adjust the amount of cement and water for your project. If you want to pour a cubic yard of concrete, check the calculator for the total volume of cement required. Always mix in small batches to keep the quality high.
Mortar needs a different ratio. For brickwork or blockwork, you mix one part cement with four to five parts sand. Add water until you get a smooth, workable paste. The volume of one bag of cement will give you enough mortar for several rows of bricks. Use a calculator to estimate the amount of cement and sand you need. This step helps you avoid waste and ensures you have enough material for the job.
Note: Always check the instructions on your cement bag. The right ratio and amount of cement make your concrete and mortar strong and long-lasting.
You can create custom stepping stones for your garden using bagged concrete jobs. Start by choosing a mold or making one from scrap wood. Mix the concrete in a wheelbarrow or bucket. Pour the mix into the mold and tap the sides to remove air bubbles. Smooth the top with a trowel. Let the slab set for at least 24 hours before removing it from the mold. You can add pebbles or colored glass for decoration. Each 25kg bag gives you enough concrete for one or two stepping stones, depending on the size and thickness of each slab.
Tip: Dampen the mold before pouring the concrete. This step helps prevent sticking and gives your slab a smooth finish.
Bagged concrete jobs make it easy to build small garden features like edging, planters, or decorative slabs. You can shape the concrete into any form you want. Use a simple mix ratio, such as the common "5-for-2" formula, which many artisans use based on experience. This approach works well for small projects. You control the thickness and size of each slab, so you avoid waste. If you want to add texture, press leaves or stones into the surface before the concrete sets.
Many people use informal batching methods, such as wheelbarrow measurements, for these projects.
About 61% of artisans rely on experience to mix concrete, while 30% follow client instructions.
Only 29% understand how batching affects the final slab, which can lead to uneven strength or cracks.
You can avoid these problems by measuring your materials carefully and mixing the concrete thoroughly.
Cracks in walkways or patios can cause problems if you ignore them. You can use bagged concrete jobs to patch these areas quickly. Clean the crack and remove loose debris. Mix a small batch of concrete and press it into the gap. Smooth the surface with a trowel. For larger cracks, pour a thin slab over the damaged area. Let the concrete cure before using the path again. This method restores strength and prevents further damage.
You often need to secure fence or mailbox posts with a stable base. Bagged concrete jobs let you pour a small slab around the post. Dig a hole, place the post, and pour the concrete mix. Tamp it down to remove air pockets. The slab will set in a few hours, holding the post firmly in place. Many DIYers use informal batching, but careful mixing ensures your slab stays strong and resists shifting.
️ Note: Inconsistent batching can cause defects like cracks or rapid mortar breakdown. Always follow the instructions on your cement bag for best results.
Bagged concrete jobs give you flexibility for repairs and small builds. You can handle each slab easily and mix just enough concrete for the task. This approach saves time, reduces waste, and helps you achieve professional results at home.
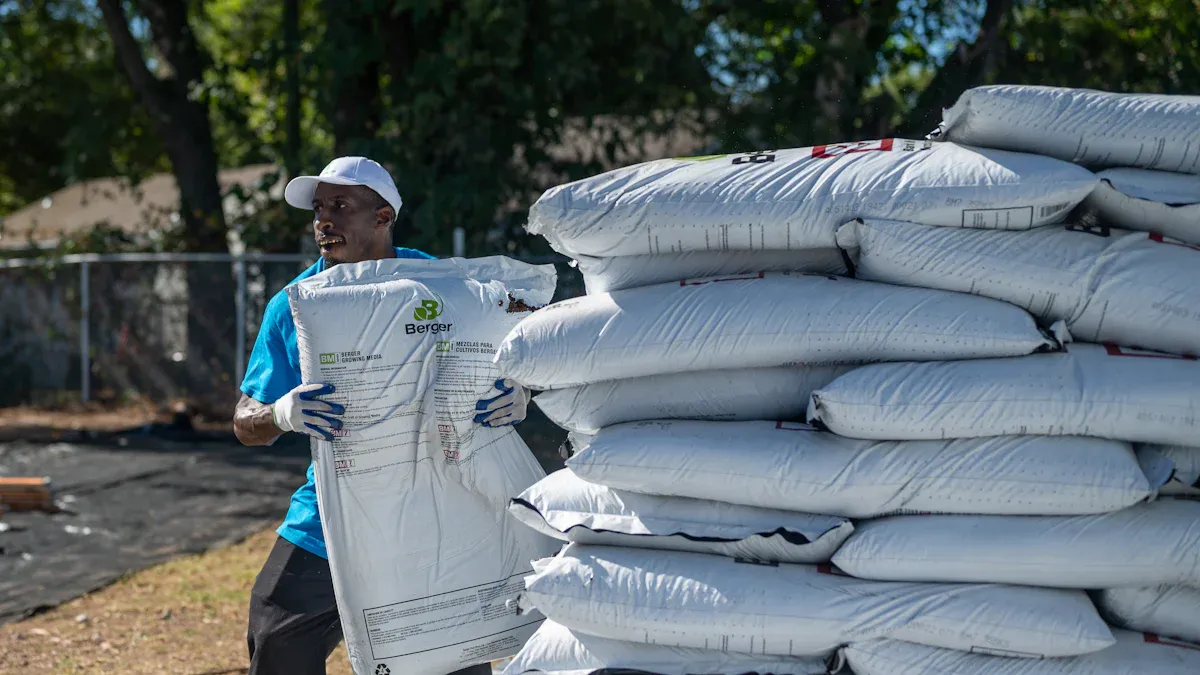
You need to protect cement from moisture at all times. Moisture can ruin the quality of the powder and make it clump or harden before you use it. Always store cement bags in a dry, covered area. Place the bags on wooden pallets or raised platforms. This step keeps them off the ground and away from dampness. Stack the bags no more than ten high to prevent the weight from crushing the lower ones.
Tip: Never store cement bags against walls or in direct contact with floors. Airflow around the bags helps keep them dry.
If you plan to store cement for more than a week, cover the stack with a waterproof sheet. Make sure the cover does not touch the bags directly. Leave space for air to circulate. Check the storage area for leaks or standing water after rain. If you find any damp bags, use them first. Fresh cement always gives you better results.
You should always use safe lifting techniques when moving cement bags. A 25kg bag weighs about 55 pounds, which can strain your back if you lift it the wrong way. Safety experts recommend that you keep the bag close to your body and bend your knees, not your back, when picking it up. Avoid twisting your body while lifting or carrying the bag.
Here are some best practices for lifting and transporting cement:
Check the weight before you lift. If it feels too heavy, ask for help or use a cart.
Keep your hands dry and grip the bag firmly.
Lift with your legs, not your back.
Hold the bag at waist height and keep it close to your body.
Avoid lifting bags from below your knees or above your shoulders.
A few organizations provide guidelines to help you stay safe. For example, ergonomic studies suggest you should not lift more than 51 pounds at once. They also recommend you avoid twisting, holding loads far from your body, or lifting with one hand. If you need to move several bags, take breaks to prevent fatigue.
| Safe Lifting Checklist | Yes/No |
|---|---|
| Bag close to body? | |
| Knees bent? | |
| No twisting? | |
| Good grip? | |
| Used cart for distance? |
⚠️ Note: Using proper lifting techniques reduces your risk of injury and helps you handle cement safely every time.
You can save time and money by planning the right amount of cement for your project. Accurate estimates help you avoid running out of material or ending up with too much leftover. Here is step-by-step guidance to help you calculate the volume and amount of cement you need:
Measure the length, width, and thickness of your slab or area in feet.
Multiply these numbers together to get the total cubic feet.
Divide the total by 27 to convert cubic feet to cubic yards.
Add 10% extra to your result to cover waste and small errors.
Round your final amount to match the supplier’s options.
For small jobs, use a calculator from manufacturers like Quickrete or Sakrete. These calculators let you enter your project’s dimensions and give you the number of bags needed.
For complex projects, digital tools such as CAD or BIM provide precise measurements and help you plan the amount of cement more efficiently.
Tip: Always use a calculator before you buy cement. This step ensures you get the right amount and avoid costly mistakes.
You can also find online calculators that estimate the volume and amount of cement for different projects. These tools make it easy to adjust your numbers if your project changes. If you plan carefully, you will have just enough cement for your needs.
Reducing waste helps you save money and protect the environment. Studies show that about 3% of concrete produced at ready-mixed plants becomes waste, mostly because of over-ordering. Accurate planning and using a calculator can help you avoid this problem. Over-ordering often leads to leftover cement, which can be hard to reuse if it sets.
You can use leftover cement for small repairs, patching cracks, or making garden features. If you have a small amount left, pour it into molds to create stepping stones or pavers. This way, you turn extra material into useful items instead of throwing it away.
Economic research shows that recycling concrete waste saves resources and brings financial benefits.
Technical studies suggest you can replace some cement with by-products like fly ash, which reduces the amount of cement you need.
Training and awareness programs help workers sort and reuse leftover cement, making your project more sustainable.
Tips: Store leftover cement in a dry, sealed container to keep it fresh for your next project. Use hydration-stabilizing admixtures if you need to keep mixed cement workable for longer.
You can make a big difference by planning your amount of cement carefully and finding creative ways to use leftovers. This approach saves you money and supports a cleaner environment. Good guidance and the right calculator help you achieve efficient cement use every time.
You often face a choice when selecting the right cement bag size for your home project. For small jobs, the 25kg cement bag size stands out as the most practical option. You can easily carry and store these bags, which makes them ideal for tasks like patching a walkway, setting a few fence posts, or building a small patio. You do not need heavy equipment or extra help to move a 25kg bag. This size fits well in most car trunks and home storage spaces.
A comparative case study shows that using a 25kg cement bag size with a mixing drum and cart works best for small-scale projects. In 87% of tested situations, this combination proved to be a sustainable and convenient choice. You get just enough material for your project, which helps you avoid waste and keeps your workspace tidy. You also reduce the risk of leftover cement hardening before you can use it.
Tip: Choose the 25kg cement bag size for repairs, garden features, or any project where you want easy handling and less mess.
You may wonder how the 25kg cement bag size compares to larger or bulk options. Each cement bag size has its own advantages. The table below highlights the main differences:
| Cement Bag Size | Best For | Handling | Storage Needs | Waste Risk | Cost-Effectiveness |
|---|---|---|---|---|---|
| 25kg | Small projects, DIY | Easy, single lift | Minimal | Low | High |
| 50kg | Medium to large jobs | Heavy, two-person | More space | Moderate | Moderate |
| Bulk (1 ton+) | Large construction | Equipment needed | Large area | High (if unused) | High (for big jobs) |
You see that the 25kg cement bag size offers the most flexibility for home use. You can buy only what you need, which helps you control your budget and reduce waste. Bulk bags work well for big construction sites, but they require special handling and storage. If you choose a larger cement bag size for a small job, you may struggle with lifting and risk having leftover cement that goes to waste.
Note: Always match the cement bag size to your project scale. For most home repairs and improvements, the 25kg cement bag size gives you the best balance of convenience and cost-effectiveness.
You make your work easier and more efficient when you select the right cement bag size. You also help the environment by reducing waste and using only what you need.
You can tackle many home projects with a 25kg cement bag. This size gives you flexibility for concrete, mortar, and repairs. When you understand coverage, mixing, and storage, you save time and avoid waste. Use calculators and follow safety tips for the best results. Plan your next project with confidence and make every bag count.
️ Take action: Choose the right amount, mix carefully, and store your cement well for strong, lasting results.
You can cover about 0.01 cubic meters with one 25kg cement bag when mixing concrete. This volume fits small slabs, footings, or repairs. Use concrete calculators for accurate estimates before starting your construction project.
You should choose a 25kg cement bag size for a garden retaining wall. This size offers cost-effectiveness and easy handling. You can mix just enough concrete for each footing and avoid waste.
Start with step-by-step guidance. Measure your area, then use concrete calculators to find the total volume of cement required. This method helps you get the job done right and prevents over-ordering.
Yes, you can use bagged concrete jobs for adding concrete footings. A 25kg cement bag gives you control over the mix and volume. You can pour footings for posts or small structures with ease.
You need about 76 bags to make a cubic yard of concrete. Always check the volume of one bag of cement and use a calculator for precise planning. This ensures you have enough material for your construction project.
Use clean water and measure your materials. Mix in small batches to control the volume. Remove air pockets by tapping the mix. These project pro tips help you get the job done right and improve the strength of your concrete.
Store your cement bag size on pallets in a dry place. Keep bags away from walls and moisture. Cover with a waterproof sheet if needed. Good storage guidance keeps your cement fresh for your next construction project.
Cost-effectiveness lets you buy only what you need. You avoid waste and save money. A 25kg cement bag size works best for most home projects, giving you flexibility and easy storage.


